In this post, I’ll walk you through various aspects of old shower valve identification in order to help you make an informed decision.
In case of any doubt or query related to an old shower valve identification, feel free to contact us, and our core team will be more than happy to assist you.
So, without any further ado, let’s begin…
If your shower valve is leaking or broken and you want to repair it, you need to be well-versed with the type of valve used in order to make repairment a success which will definitely to a large extent depends upon the manufacturer and the valve’s sole purpose.
So, if you’re in a dilemma about identifying your shower valve type, then I’ve got a piece of good news for you.
This guide only talks about old shower valve identification and will make your work easier than you think.
So, stay tuned and keep reading.
First and foremost, you need to find the brand name or manufacturer’s symbol which will be present behind the shower handle at the center of the trim plate.
Another way to find the brand name is by using the cartridge length.
Logos of Major Faucet Brands
| American Standard | Blanco | Brizo |
| Chicago Faucets | Danco | Danze |
| Delta | Gerber | Glacier Bay |
| Grohe | Hansgrohe | Kohler |
| Moen | Newport Brass | Peerless |
| Price Pfister | Toto | — |
Quite a few of our clients confuse between a shower valve and a shower faucet.
The shower valve is the hidden part of the shower control.
On the other hand, the shower faucet aka trim kit is the outside part with the handle.
However, the design of a shower handle/faucet often denotes the design of the shower valve.
The good news is that the types of shower faucet handles will clearly depict the type of value that is beneath them.
At the same time, don’t confuse a shower valve with a shutoff valve. The latter is the one that is used for controlling water in your bathroom.
Moreover, some shower panels come with their own shower valves.
[Related] Shower Valve HeightHow to Identify an Old Moen Shower Valve?
It goes without saying that Moen is a brand that doesn’t need any introduction, and most importantly, the Moen shower valves have proved their mettle time and again.
The brand is known for delivering high performance and providing innovative and budget-friendly products for more than a decade.
Many of you wouldn’t be aware of the fact that Moen is the third most popular faucet brand in the United States, interesting, isn’t it?
Below-mentioned steps will help you identify an old Moen shower valve.
Step 1
- The first thing that you need to do is to look carefully at the handle buttons that were attached to the shower valve.
- You need to find the word “Moen” written in the middle of the “Hot” and “Cold” buttons.
- However, if couldn’t find the word written there it simply means either the handle buttons have been replaced or the “Hot/Cold” button is a lever.
Step 2
- Once you’re done with the aforementioned step, the next thing that needs to be done is to have a close look at the wall escutcheon.
- This is a form of a plate that resides in the vicinity of the “Hot/Cold” level responsible for turning the shower water on.
- Check for the word “Moen” as it will be written on the metal wall escutcheon plate surrounding the level.
- Unfortunately, the wall escutcheon has been replaced if you’re not able to see the word “Moen.
- Don’t worry, we’ve got one more place to look for that we’ll discuss in step 3.
Step 3
- If you couldn’t find the name in the aforementioned places then you need to remove the wall escutcheon as well as any handle buttons in order to view the valve body of your shower valve.
- Trust me, the word “Moen” will be stamped on the side of the valve body even on very old Moen shower valves.
How to Identify American Standard Shower Valve?
Things Needed
- Towel
- Computer or plumbing parts book
- Allen wrench
Step 1
- To begin with, you need to turn off the faucet water supply in case, the faucet is installed.
- The next thing that you need to do is to access the shower water pipe valves behind the shower wall, or even turning off your home’s main water supply isn’t a bad idea either.
Step 2
- Make sure you’ve got a close watch on the base of the shower faucet spout on the front.
- You’ll find the word “American Standard” printed on them.
- However, if your faucet is corroded or has limescale, you need to spray with a cleaning agent and wipe it with a towel to make the letters visible.
- Moreover, you can also locate the word “American Standard” on the trim piece surrounding the shower faucet handle.
Step 3
- Once you’ve expedited the aforementioned steps, the next thing that needs to be done is to match the faucet visually using pictures from the company’s website or even from a repair part book.
- You can start by selecting the type of faucet it is and searching using this criterion.
- Make sure you visit the main website of American Standard Faucet and also select the type of faucet, to begin with.
- Furthermore, a list of repair parts will populate your faucet.
Step 4
- Now, it’s time to match the handle, spout, and most importantly, inner parts to the images you find to determine the exact make and model.
Step 5
- Use an Allen wrench to remove the set screw in the handle and take off the handle.
- Three set screws need to be removed in the cartridge with a Phillips screwdriver and pull the cartridge out.
- Lastly, view and match the cartridge to the parts you find on the website or even in the plumbing parts book.
How to Identify Delta Shower Valve?
To be honest, you need to identify your delta shower faucet only when you’ve to replace a part of it.
Needless to say, delta shower faucets are available in different models and each one differs from the other in terms of features.
It goes without saying that the proper information about your delta shower faucet model number will make your work easier.
The 3 steps identification mentioned below will do the trick for you.
Step 1: Identify the main features of your delta faucet
What I actually mean by saying that you need to identify the main features of your delta faucet is knowing the handle’s shape & size along with the style of your faucet.
As we all know, the brand delta designs each model separately so proper information about the aforementioned models really becomes important for you in all respect.
If we differentiate the delta faucets on the basis of handles, then they fall into three categories, that is, lever handles, single-round handles, and double-handle shower faucets.
Also, it’s a good idea to have information about the type of finish.
In general, delta faucets can be categorized into two sections on basis of the type of finish, that is, chrome, and brushed metal.
If you wanna differentiate the faucet models on the basis of the type of material, then it can be either metal or plastic.
Step 2: Remove the handle
- Once you’re done with the aforementioned step, the next thing that needs to be done is removing the handle which can you do by using an Allen wrench.
- The set screws are present either on the side of the handle or underneath a cap that itself is present on the top of the faucet handle, you need to unscrew it using an Allen wrench.
- Simply, pull off the faucet and look for the cartridge.
- Look for the scald guard which will imitate an appearance similar to a dial-shaped part that comes with a notched knob.
Step 3: Matching the specific unit online
- This is the most important step wherein you need to browse through Delta’s website in order to find the exact unit that you’ve got. Go to Delta’s homepage and click on the bath link.
- You’ll find a menu wherein all the bath products of the company will be listed. You need to select the bathtub and shower faucet.
- By doing so, you’ll be navigated to another page on the Delta website where you’ll have to select features in order to get a matching product.
- Lastly, after you’ve made your selections, click on view matching products.
What Type of Shower Valve Do I Have?
To find the answer to what type of shower valve I’ve, you need to look at various aspects of shower valves.
Moving further, I’ll walk you through various aspects in order to help you make an informed decision.
Shower Valve Manufacturer Identification
Frankly speaking, if you want to know how to identify the shower valve manufacturer, all you need to do is to check behind the shower handle at the center of the trim plate for the manufacturer’s symbol or brand name.
If you can’t locate any markings on the faucet then you don’t have an option but to start disassembling it.
You need to begin with the handle.
Moreover, you’ll be able to measure the cartridge (stem) length of the faucet or resort to the number of splines.
Needless to say, the information is vital in repairing or replacing the shower valve since some have specific measurements which may not fit into the others.
In layman’s terms, you identify the shower faucet brand by looking at the writing on the shower faucet.
Shower faucet types determine the shower valve underneath them.
Handle’s Number
You need to count the number of handles by having a look at the shower faucet.
- In the absence of any handle, it will be a panel shower faucet that consists of buttons for controlling the water flow.
- A single-handled faucet consists of one handle and controls the water pressure and temperature of the handle control.
- A double-handled faucet consists of two handles that are used to control the hot and cold water flow.
- A three-handled faucet consists of three handles. Out of the three handles, two are used for controlling the hot and cold water respectively. However, the third handle works as a diverter between the bathtub and the showerhead.
Out of the three types of faucets, the single-handled faucet is the one that is quite common and easy to use.
Again, I’m reiterating that shower handle types are very important in identifying the shower valve type.
Connection Type
You need to check above your faucet for the connection between the showerhead pipe and the rest of the plumbing.
Definitely, you’re gonna witness one of the below-mentioned things.
- Handset/handheld showerhead – You can find this when a hose runs from the showerhead to the shower pipe behind the faucet handle.
- Fixed/mounted showerhead: You’ll find this when the showerhead is directly mounted to the shower pipe from the wall.
Each of these has its own advantage. For example, if you’re looking for flexibility then a handheld showerhead is good to go.
On the other hand, a fixed showerhead may or may not be turned around through different angles.
Water Flow
You need to jot down the water behavior by turning on the showerhead and then moving through different shower settings.
In case, there is a single constant flow, then it simply means that the showerhead is a normal one.
On the other hand, if you find water bursts from the showerhead in a series of bursts, then expect your showerhead to be a massaging or pulsating one.
By closely watching both scenarios, you’ll be able to have a wholesome picture of the type of shower knobs and shower valves you’ve in your shower.
Furthermore, you can then get a replacement from the manufacturer with the right specifications.
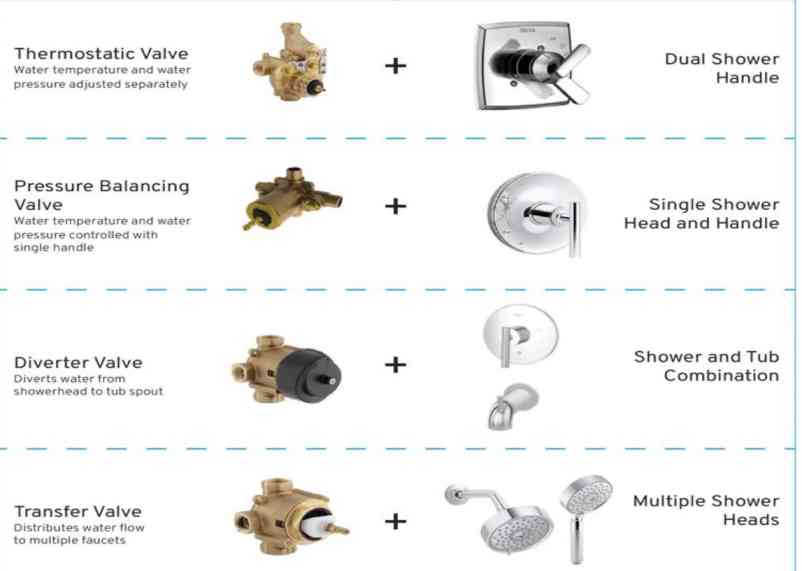
Shower Valve Types Chart
Let’s have a quick look at shower valve types so that you can make an informed decision.
| Shower Valve | Feature |
| Shower mixing valve | Mixes hot and cold water from taps |
| Thermostatic valve | Controls water temperature and pressure |
| Shower transfer valve | Controls water flow to multiple outlets |
| Pressure balancing valve | Balances hot and cold water pressure |
| Shower diverter valve | Diverts water between the bathtub and showerhead |
Shower Mixing Valve
Shower mixing valves are one of the old shower valve types and are meant to mix water from the hot and cold taps before delivering it to the showerhead.
Shower mixer valves are often found in old buildings and won’t regulate a sudden change in water pressure.
It is quite possible that this might scald you.
For example, the water pressure for cold water drops when someone turns on the water in a nearby tap or flushes the toilet.
Moreover, you can avoid this by keeping the hot water thermostat to a maximum of 120 degrees Fahrenheit.
Thermostatic Valve
Thermostatic shower valves control the temperature and pressure of the water coming out of the showerhead most importantly, a thermostatic valve comprise a thermostatic element that is capable of adjusting the flow of both hot and cold water in response to temperature changes.
Furthermore, you present the water temperature than the valve maintains it that way no matter the changes in the incoming hot and cold water.
On top of it, you can also set the volume of water from each water source (hot and cold) after which the valve does the rest.
A thermostatic valve is one of the most expensive shower valves given its features.
Shower Transfer Valve
It is a known fact that a transfer valve regulates water flow to multiple outlets such as bathtub spouts, handheld showerheads, and others at the same time.
Trust me, with transfer valves, you can use more than one outlet at the same time such as both fixed and handheld showerheads or showerheads with a tap.
Pressure Balancing Valve
As the name suggests, a pressure-balancing valve is capable of automatically balancing the water pressure from hot & cold pipes within 2-3 degrees Fahrenheit of the set temperature which further enhances the usability of the end users.
Needless to say, a pressure balancing valve is the most common and effective shower valve and is therefore popular by many other names such as anti-scald valves, or mechanical valves.
The valve has a unique style of working and expedites the process through a series of diaphragms or pistons which moves to balance the pressure of the water from the cold and hot water sources.
Moreover, they usually come with a single knob that changes the water temperature when turned to the left or the right.
Shower Diverter Valve
The last valve on our list is the shower diverter valve which works extremely well when it comes to diverting water from a bathtub faucet to the shower head.
By doing so, this valve helps in the installation of a bathtub and a shower in the same location, interesting, isn’t it?
Let’s have a quick look at some of the most popular and commonly used shower diverter valves that you can also opt for if they fall under your budget and caters to your requirements.
Tee Diverter
It consists of a pull arm that helps in running water in the tap, and as soon as the favorable temperature is achieved the arm is pulled in such a way that the faucet gets blocked, and as a result, the water is directed to the shower.
Two-Valve Diverter
As the name suggests, it uses a rotating control for hot and cold water.
The second control is used for diverting water between the tub and the shower.
Three-Valve Diverter
The unique thing about a three-valve diverter is that it uses three knobs, two are used for cold and hot water, and the third one helps in diverting water between the tub and shower.
In layman’s terms, knowing your shower valve type will help make the replacement and repair of the valves easier for you, and the process can be expedited in an epigrammatic span of time with ease.
I’m attaching a self-explanatory video for your perusal.
Steps Involved in Taking Apart a Shower Faucet
Let’s have a quick look at the various steps involved in taking apart a shower faucet so that you don’t have to deal with any last-minute misadventures.
Step 1: Turn Off the Water Supply
First and foremost, you need to turn off the water supply which can be easily done by locating the cut-off valves, that is, you’ve to choose from hot and cold variants.
On the other hand, if you’re working on the shower, you’ll have to locate the main water valve for the house that will be located outside either along the house or building.
Step 2: Remove the Handle
Now, it’s time to remove the handle.
In order to expedite this step, you would be needing a screwdriver set such as Allen wrenches.
Moreover, the type of screwdriver that you would be needing will depend on the type of handle.
For example, if you’re working on a single-lever handle, you’ll have to locate a small set crew in the handle and use an Allen wrench.
On the other hand, if you’re working with a crystal handle, there will likely be a plastic cover that you can pop off with a flat-headed screwdriver.
Moreover, there you’ll be able to access the stem with a Philips screwdriver.
Last but not least, if you’re working with a faucet with two handles, you need to remove the decorative cap/plastic cover, that is, pry it off with a Philips screwdriver.
Step 3: Pull the Stem & Handle Out
After removing the screws, the next thing that needs to be done is to pull the stem and handle out as they often come out together.
Moreover, you may have to wiggle the stem as you gently pull it out to fully disengage it.
How to Use a Faucet (Valve/Stem) Cartridge Identification Chart
Let’s have a quick look at the below-mentioned steps that will help you in using a faucet cartridge identification chart.
- First and foremost, you need to use a caliper or a ruler and measure the cartridge and it should be done by measuring from the base to the tip, that is, from the seat to the splines.
- At the same time, it is equally important to pay attention to the length tier of your cartridge. The length falls in the range of 1 to 12.
- Moving further, you need to identify the broach pattern with the broach chart.
- Then, you need to find your stem’s length tier.
- You need to find the matching broad pattern and ensure it is correct.
- Next, you’ll take note of the part numbers that you’ll need.
Shower Faucet Repairing Tips
By following the below-mentioned shower faucet repair tips, you’ll make your work easier.
Pay attention to warranties
Warranties must be taken good care of in order to deal effectively with any last-minute debacle.
You need to keep all paperwork and documentation of your faucet type and model in place.
Check whether your product is under warranty or not.
If it’s under warranty, you may qualify for free replacement parts if you contact the manufacturer.
Know Where Your Brand Supplies
Some well-known brands such as Pfister don’t sell parts in a local hardware store.
The good news is, you can find them on online retailers such as Amazon, and delivery time falls in the range of 1 to 3 days.
Take Note of Which Parts are Interchangeable
It is equally important to keep a note of the parts that are interchangeable.
There are some parts that aren’t interchangeable including rubber seats, O-rings, and springs.
Most importantly, they can look similar between brands but they may not be the same.
For example, Delta valve seats look almost similar to Pfister’s design.
However, you’ll find the diameters to be different which may result in leaks and other similar problems.
It’s A Wrap
First and foremost, I would like to thank you for being with us till the end.
Secondly, I would like to bring to your notice that I along with my core team have put loads and loads of effort into coming up with this idiosyncratic superlative piece of information on the topic of old shower valve identification.
And, in case, you liked our effort and want to appreciate us then please do share this post with like-minded individuals as well as the ones who are in search of similar information.
After all, sharing is caring, isn’t it?
Long story short, I’ve tried to the best of my capabilities to inculcate all the necessary pieces of information that will help you in identifying an old shower valve.
Still, if you’ve any doubts or queries, contact us.
That’s all, as of now:):)
[Related]